이번에는 Python을 이용하여 GUI를 이용하는 방법을 배워보려고 합니다, Python에서 제공하는 다양한 GUI Library가 있는데, 여기서는 EasyGUI와 TKinter를 봐보려고 합니다.
EasyGUI
제목 그대로 EasyGUI는 손쉽게 GUI를 사용할 수 있는 방법으로 간단한 MsgBox나, ChoiceBox등을 간단하게 이용할 수 있습니다.
설치
설치는 손쉽게 pip를 이용하여 설치할 수 있습니다(Mac같은 경우에는 sudo가 필요할 수 있습니다.)
$ pip install easygui
Yes/No Box
간단히 OK와 Cancel 버튼이 필요한 경우에 이용할 수 있습니다.
# coding=utf-8
import easygui

# Yes/No Box
easygui.ynbox('메시지', '제목', ('Yes', 'No'))
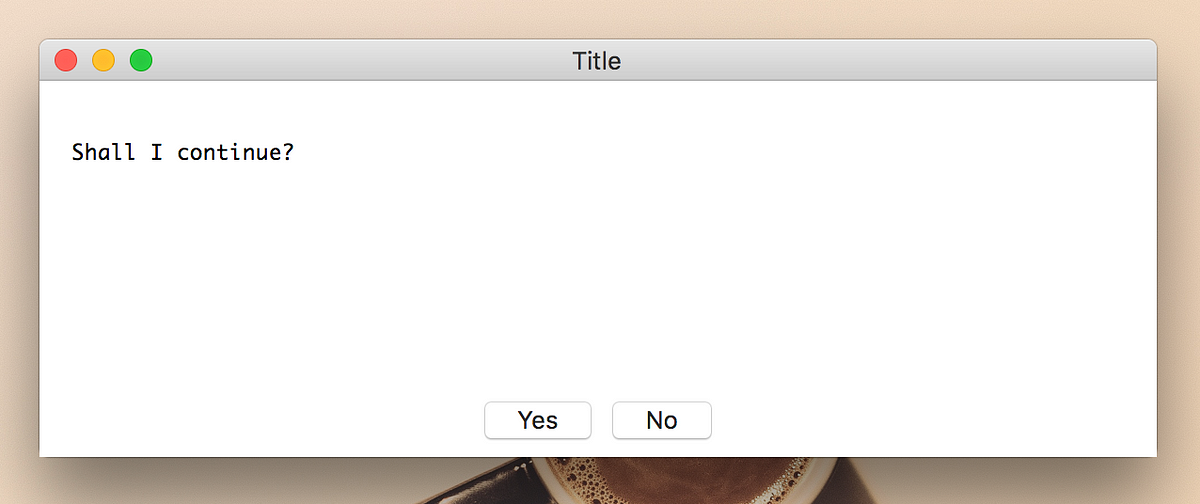
실습
import easygui

# Yes/No Box
easygui.ynbox('Shall I continue?', 'Title', ('Yes', 'No'))
Msg Box
단순 메시지만 보여주고 버튼이 여러개 필요하지 않을때 이용할 수 있습니다.
easygui.msgbox('메시지', '제목')
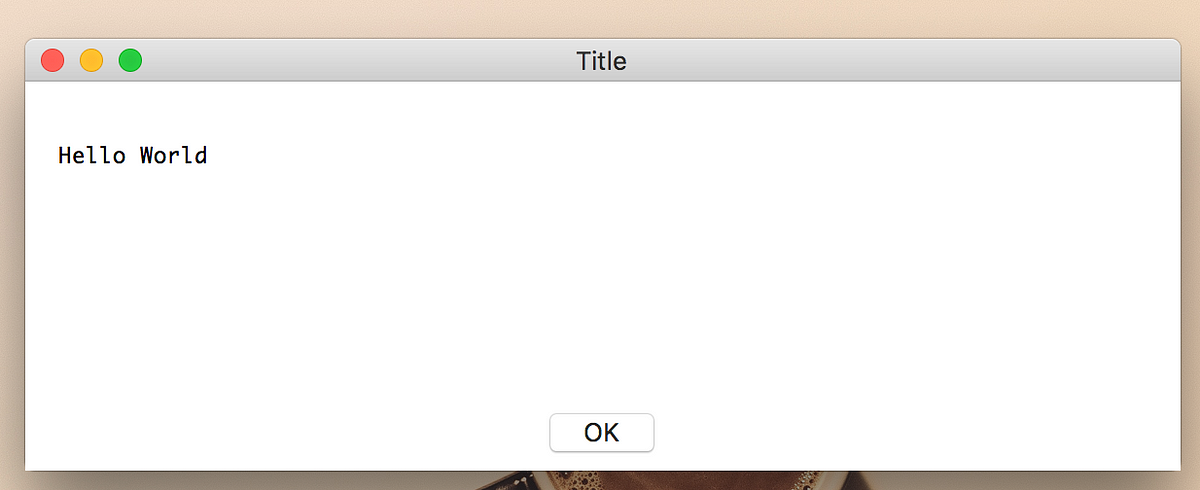
실습
import easygui

easygui.msgbox('Hello World', 'Title')
Button Box
여러개의 버튼을 사용하고 싶을때 이용할 수 있습니다.
easygui.buttonbox('메시지.', '제목', ('버튼1', '버튼2', '버튼3'))
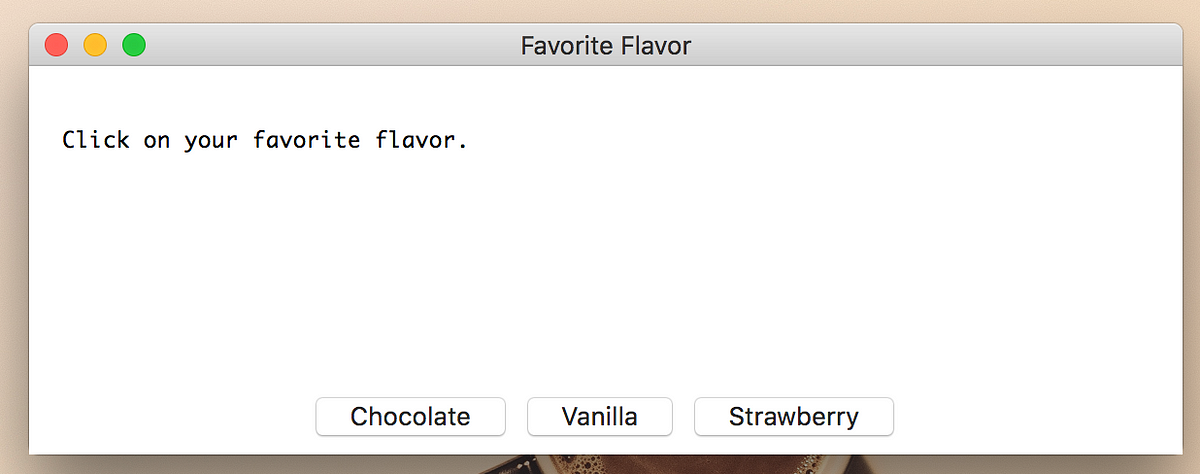
실습
import easygui

easygui.buttonbox('Click on your favorite flavor.', 'Favorite Flavor', ('Chocolate', 'Vanilla', 'Strawberry'))
Choice Box
간단히 여러 옵션이 있을때 사용할 수 있습니다.
easygui.choicebox('메시지', '제목', ['옵션1', '옵션2', '옵션3'])
실습
import easygui

msg ="What is your favorite flavor?"
title = "Ice Cream Survey"
choices = ["Vanilla", "Chocolate", "Strawberry", "Rocky Road"]
easygui.choicebox(msg, title, choices)

Enter Box
입력값이 필요할때 이용할 수 있는 있습니다.
easygui.enterbox('메시지', '제목')
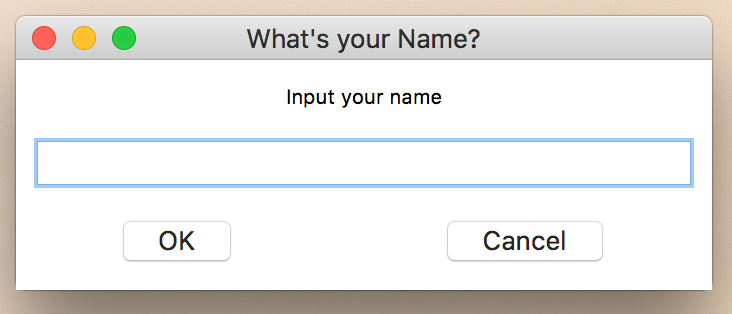
실습
import easygui

easygui.enterbox("Input your name", "What's your Name?")
MultiEnter Box
회원 가입과 같이 여러개의 입력값이 필요할때 이용할 수 있는 있습니다.
easygui.multenterbox('메시지', '제목', ['입력 필드1', '입력 필드2])
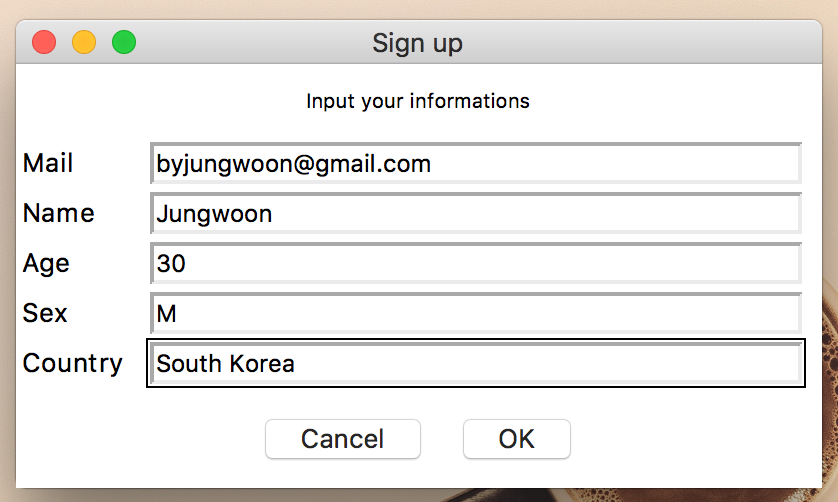
실습
import easygui

msg = "Input your informations"
title = "Sign up"
fieldNames = ["Mail", "Name", "Age", "Sex", "Country"]
fieldValues = easygui.multenterbox(msg, title, fieldNames)
informations = "Your Mail is %s \nName is %s \nAge is %s \nSex is %s\nCountry is %s" % (fieldValues[0], fieldValues[1], fieldValues[2], fieldValues[3], fieldValues[4])
easygui.msgbox(informations, 'Welcome')

TKinter
EasyGUI는 정말 간편하게 사용할 수는 있지만 지원하지 않는 기능들이 너무 많습니다. 그래서, 이때 이용할 수 있는 TKinter는 파이썬에 기본적으로 포함되어 있는 GUI 모듈로 EasyGUI 처럼 별도로 설치를할 필요가 없습니다.
기본 사용법
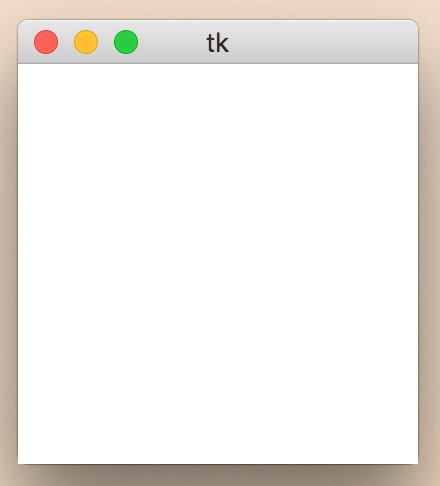
from TKinter import *

root = Tk() # Tk 클래스 객체를 만듭니다
root.mainLoop() # 빈 윈도우 화면을 표시하고 메시지 루프로, 이벤트를 받습니다
간단한 다이얼로그 만들기
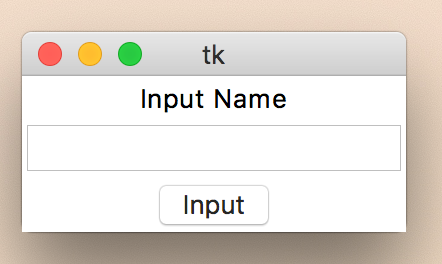
간단한 입력 윈도우 만들기
root = Tk()

lbl = Label(root, text="Input Name")
lbl.pack()

txt = Entry(root)
txt.pack()

btn = Button(root, text="Input")
btn.pack()

root.mainloop()
위의 예제는 Label과 Text Box 그리고 Button 위젯을 이용하였습니다. 이러한 위젯들은 mainLoop() 호출 전에 Tk() 인스턴스를 이용하여 배치를 하는데, 위에서는 pack() 이란걸 이용하였습니다
TKinter 화면 배치방법
TKinter는 크게 3가지 배치 방법이 있습니다
- Place : 절대 좌표를 지정합니다. (하지만, 고정좌표기 때문에 윈도우 크기에 따라 재배치를 하지 않습니다)
- Pack : 위에서 부터 차례대로 배치가 됩니다
- Grid : 테이블 형태의 레이아웃으로 배치가 됩니다 (row와 column을 이용)
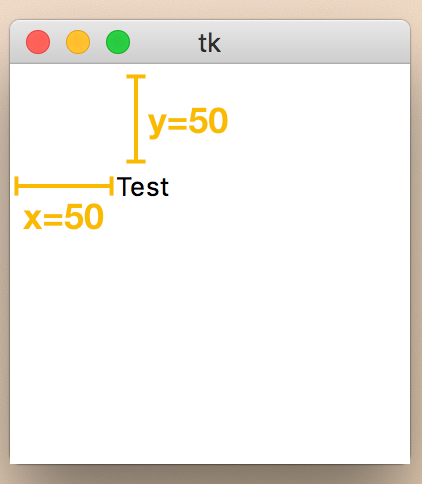
Place 사용법
from Tkinter import *

root = Tk()

lbl = Label(root, text="Test")
lbl.place(x=50, y=50)

root.mainloop()
Pack 사용법
from Tkinter import *

root = Tk()

lbl = Label(root, text="Test")
lbl.pack()

root.mainloop()
Grid 사용법
from Tkinter import *

root = Tk()

lbl = Label(root, text="Test1")
lbl.grid(row=0, column=0)

lbl2 = Label(root, text="Test2")
lbl2.grid(row=1, column=1)

root.mainloop()

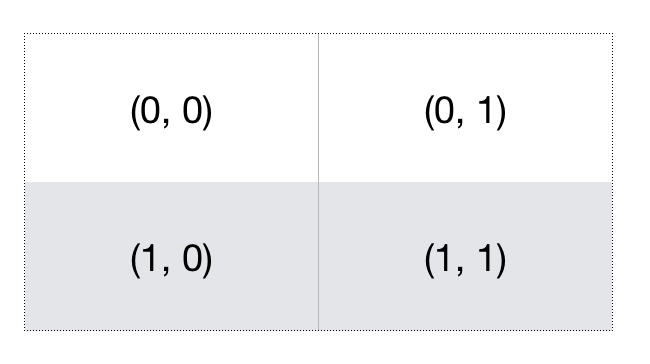
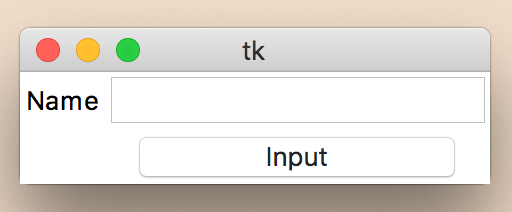
Grid 응용해보기
가장 많이 사용할만한 배열 방법인 Grid를 응용해보도록 하겠습니다
from Tkinter import *

root = Tk()

lbl = Label(root, text="Name")
lbl.grid(row=0, column=0)
txt = Entry(root)
txt.grid(row=0, column=1)
btn = Button(root, text="Input", width=15)
btn.grid(row=1, column=1)

root.mainloop()
TKinter 위젯
| 위젯 | 설명 |
|---|---|
| Button | 버튼 |
| Label | 텍스트 박스 |
| CheckButton | 체크박스 |
| Entry | 한 라인 텍스트 박스 |
| ListBox | 리스트 박스 |
| RadioButton | 라디오 버튼 |
| Message | Label과 비슷하지만 자동 래핑 기능이 있습니다 |
| Scale | 슬라이스 바 |
| Scrollbar | 스크롤 바 |
| Text | 여러줄이 가능한 텍스트 박스 |
| Menu | 메뉴 Pane |
| MenuButton | 메뉴 버튼 |
| Toplevel | 새로운 윈도우를 생성할 때 사용 |
| Frame | 컨테이너 위젯으로, 다른 위젯들을 그룹화 할 때 사용 |
Button ~ Text 위젯
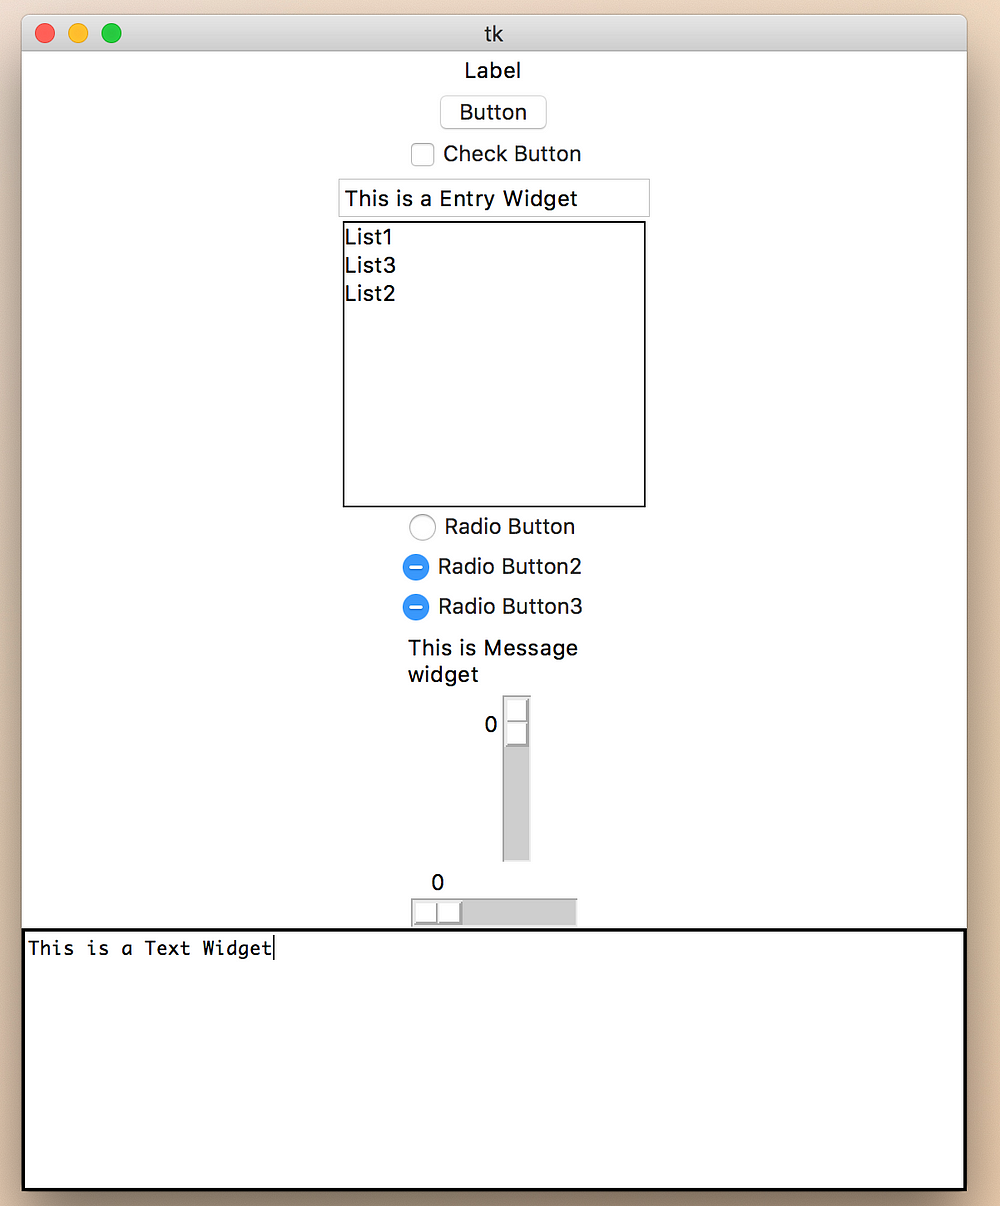
# coding=utf-8
from Tkinter import *

root = Tk()

lbl = Label(root, text="Label")
lbl.pack()

btn = Button(root, text="Button")
btn.pack()

chkbtn = Checkbutton(root, text="Check Button")
chkbtn.pack()

entry = Entry(root, text="Entry")
entry.insert(END, "This is a Entry Widget")
entry.pack()

listBox = Listbox(root)
listBox.insert(END, "List1") # index위치, 텍스트
listBox.insert(END, "List2")
listBox.insert(1, "List3")
listBox.pack()

radio = Radiobutton(root, text="Radio Button", value=1)
radio.pack()
radio2 = Radiobutton(root, text="Radio Button2", value=2)
radio2.pack()
radio3 = Radiobutton(root, text="Radio Button3", value=3)
radio3.pack()


msg = Message(root, text="This is Message widget")
msg.pack()

wScale = Scale(root, from_=0, to=100)
wScale.pack()

hScale = Scale(root, from_=0, to=100, orient=HORIZONTAL)
hScale.pack()

text = Text(root, height=10, width=80)
text.insert(END, "This is a Text Widget")
text.pack()

menubar = Menu(root)
menubar.add_command(label="Hello!", command=root.quit)
menubar.add_command(label="Quit!", command=root.quit)

root.mainloop()
Menu
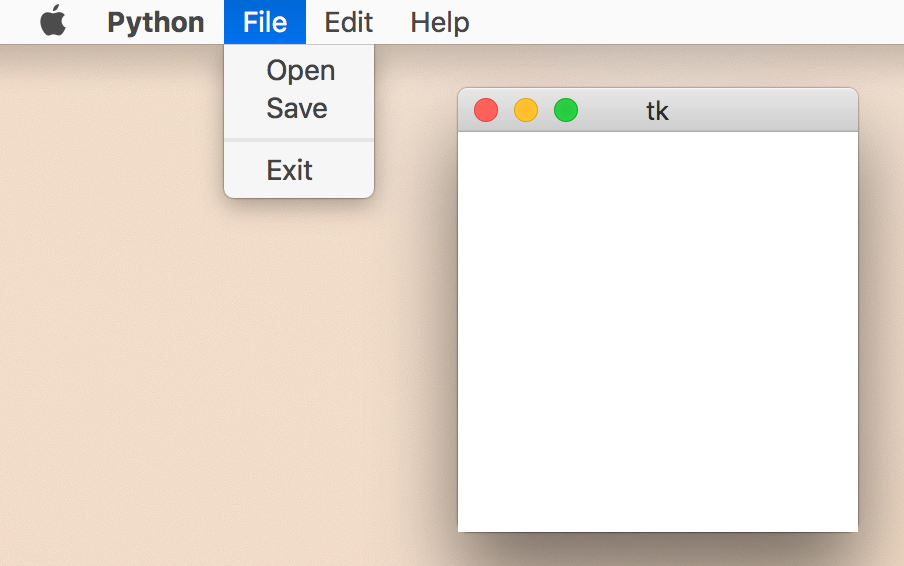
from Tkinter import *

root = Tk()

def hello():
    print "hello!"

menubar = Menu(root)

# create a pulldown menu, and add it to the menu bar
filemenu = Menu(menubar)
filemenu.add_command(label="Open", command=hello)
filemenu.add_command(label="Save", command=hello)
filemenu.add_separator()
filemenu.add_command(label="Exit", command=root.quit)
menubar.add_cascade(label="File", menu=filemenu)

# create more pulldown menus
editmenu = Menu(menubar)
editmenu.add_command(label="Cut", command=hello)
editmenu.add_command(label="Copy", command=hello)
editmenu.add_command(label="Paste", command=hello)
menubar.add_cascade(label="Edit", menu=editmenu)

helpmenu = Menu(menubar)
helpmenu.add_command(label="About", command=hello)
menubar.add_cascade(label="Help", menu=helpmenu)

# display the menu
root.config(menu=menubar)

root.mainloop()
Frame
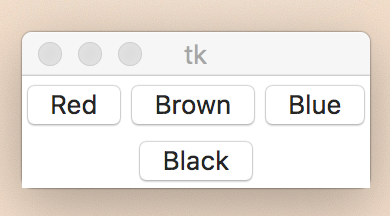
from Tkinter import *

root = Tk()
frame = Frame(root)
frame.pack()

bottomframe = Frame(root)
bottomframe.pack( side = BOTTOM )

redbutton = Button(frame, text="Red", fg="red")
redbutton.pack( side = LEFT)

greenbutton = Button(frame, text="Brown", fg="brown")
greenbutton.pack( side = LEFT )

bluebutton = Button(frame, text="Blue", fg="blue")
bluebutton.pack( side = LEFT )

blackbutton = Button(bottomframe, text="Black", fg="black")
blackbutton.pack( side = BOTTOM)

root.mainloop()
Toplevel
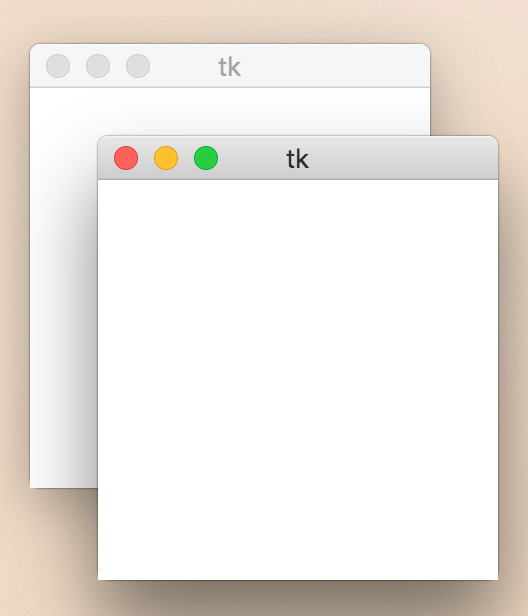
from Tkinter import *

root = Tk()
top = Toplevel()
top.mainloop()
Geometry
윈도우의 크기와 위치를 지정해줍니다.
root = Tk()
root.geomatry('가로*세로+x좌표+y좌표')
root.mainloop()
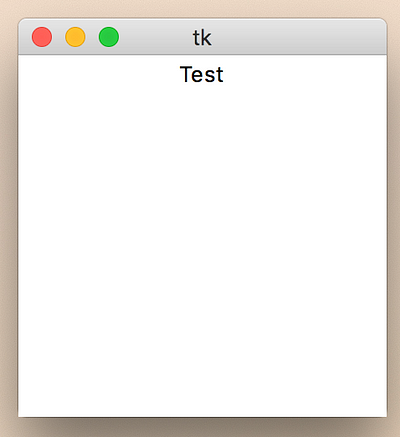
650*600 크기의 위치 (100, 100)으로 주었을때
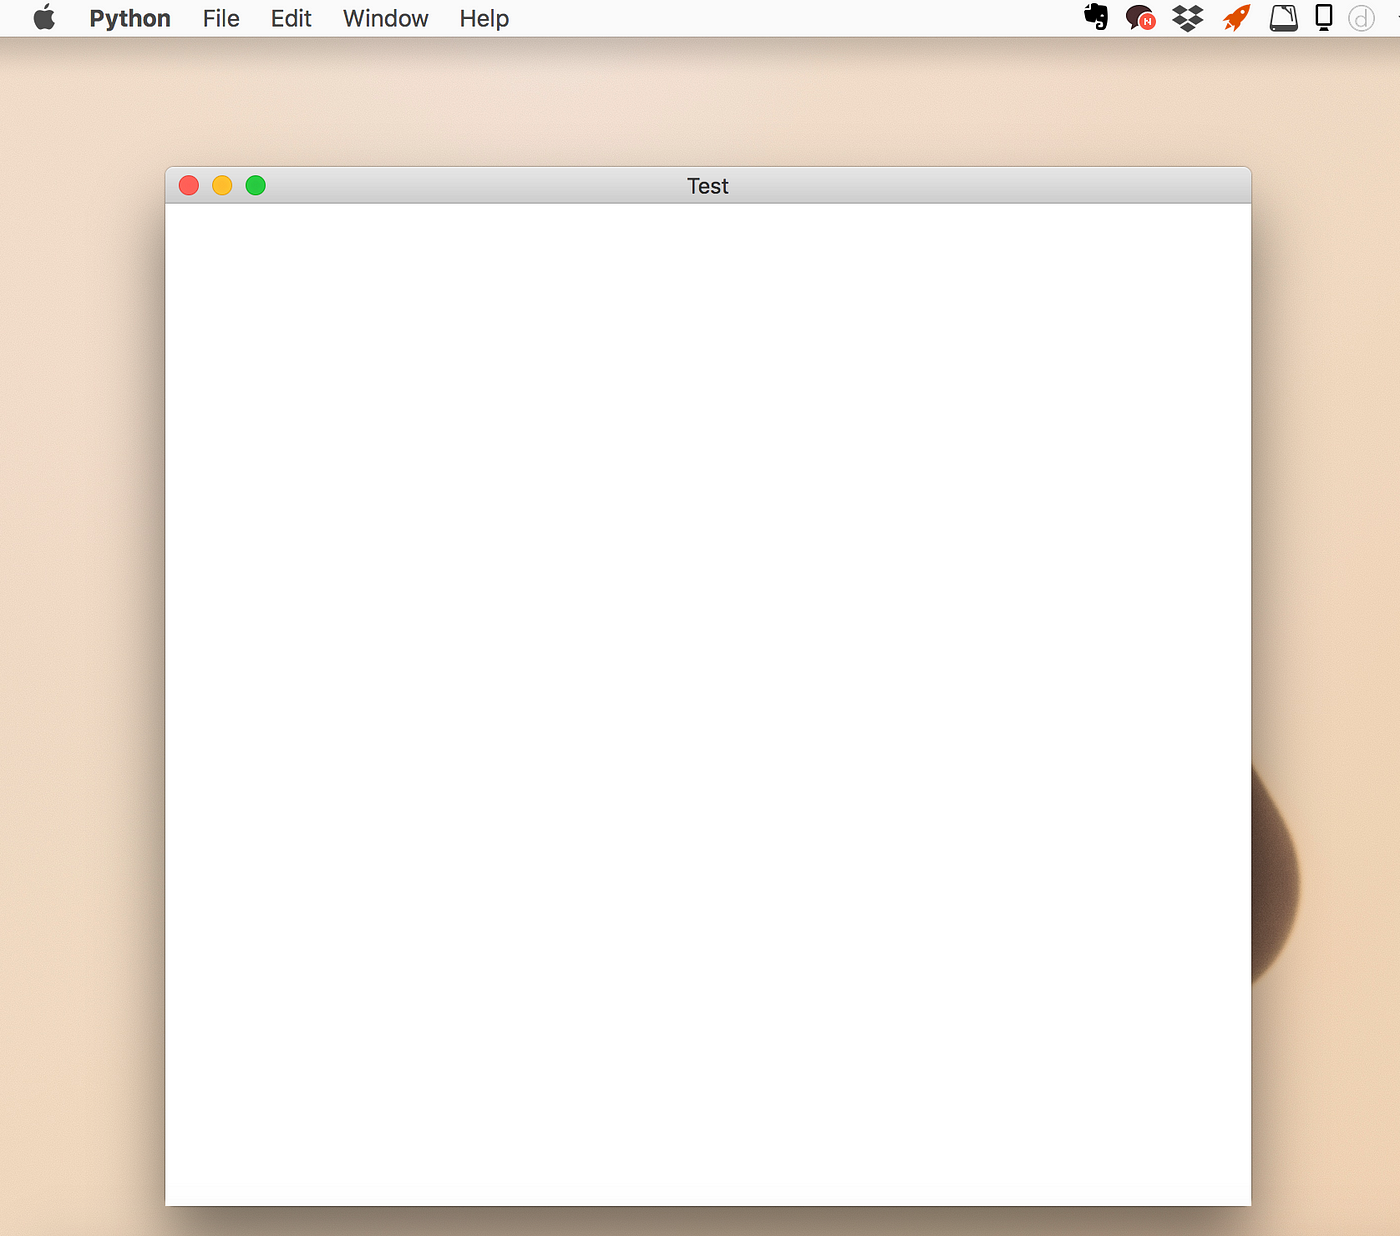
# coding=utf-8
from Tkinter import *

root = Tk()
root.title('Test') # 타이틀
root.geometry('650x600+100+100') # 창 크기와 창의 위치
root.mainloop()
이벤트
클릭을 하거나 드래그를 하거나 하는 모든 동작들을 이벤트라고 합니다.
그 예로 클릭하는 했을때 발생하는걸 클릭 이벤트라 합니다.
TKinter의 위젯 중에는 Button 같이 command=동작할 함수 옵션을 기본적으로 지원되는 위젯들이 있고,
Button을 누르면 command에 명시가 된 이벤트가 실행이 됩니다.

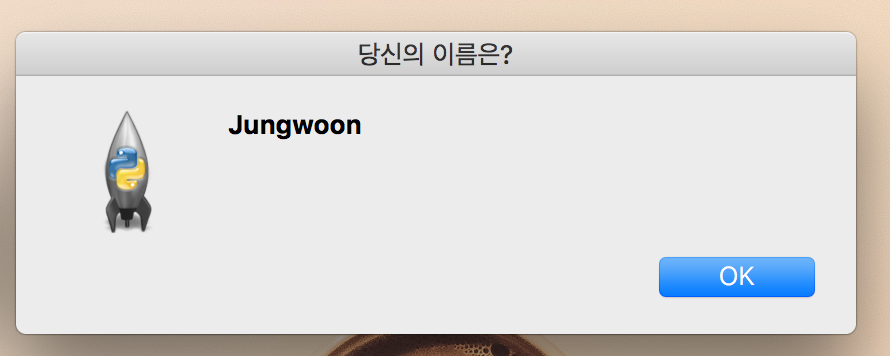
# coding=utf-8
from tkinter import *
from tkinter import messagebox

root = Tk()


# 버튼 클릭 이벤트 핸들러
def okClick():
    name = txt.get()
    messagebox.showinfo("당신의 이름은?", name)


lbl = Label(root, text="이름")
lbl.grid(row=0, column=0)
txt = Entry(root)
txt.grid(row=0, column=1)

# 버튼 클릭 이벤트와 핸들러 정의
btn = Button(root, text="OK", command=okClick) # 위에서 정의한 함수 onClick

btn.grid(row=1, column=1)

root.mainloop()
이벤트명
만약 command=동작할 함수를 지원하지 않는 이벤트들도 bind()를 이용하여 이벤트를 줄 수 있습니다.
위젯.bind("지원하는 이벤트명", 동작할 함수)
여기서 지원하는 이벤트명은 아래와 같이 있습니다.
<Button-1>: 마우스 왼쪽 버튼 클릭<Button-2>: 마우스 중간 버튼 클릭<Button-3>: 마우스 오른쪽 버튼 클릭<Double-Button-1>: 마우스 왼쪽 버튼 더블 클릭<Double-Button-2>: 마우스 중간 버튼 더블 클릭<Double-Button-3>: 마우스 오른쪽 버튼 더블 클릭<Return>: 엔터가 눌러짐<Key>: 키가 눌러짐<Leave>: 마우스 포인터가 위젯을 떠날때<Configure>: 위젯 사이즈에 변화가 있을때
이벤트 오브젝트
이벤트 오브젝트는 TKinter에서 지원해주는 오브젝트로 event.동작 의 형태로 이용합니다.
지원하는 이벤트 오브젝트는 아래와 같습니다 (아래보다 훨씬 더 많은 이벤트를 가지고 있지만 많이 쓰이는것만 소개하겠습니다.)
좀 더 자세한 리스트를 알고 싶으면
- char : 키보트 이벤트에서 발생하는 문자를 가져옵니다
- x, y : 위젯의 죄상단으로부터의 상대적 마우스 좌표
- x_root, y_root : 화면 죄상단으로부터의 상대적 마우스 절대 좌표
- Key : 이벤트가 발생한 위젯
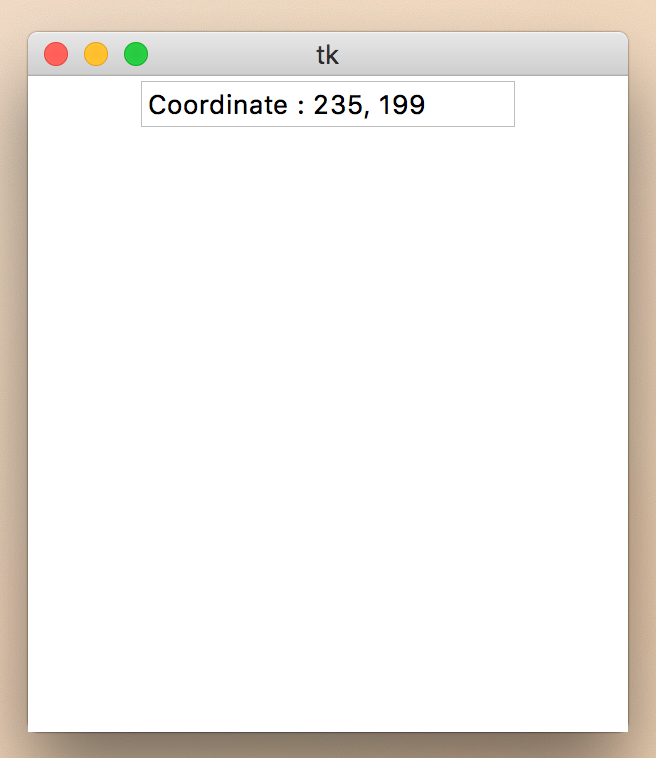
# coding=utf-8
from tkinter import *

root = Tk()

frame = Frame(root, width=300, height=300)
entry = Entry(root)
entry.pack()


def click(event):
    entry.delete(0, END) # 내용을 전부 지우고
    entry.insert(0, ('Coordinate : %d, %d' % (event.x, event.y)) ) # 내용을 추가

frame.bind("<Button-1>", click) # 왼쪽 마우스 버튼 바인딩


frame.pack()
root.mainloop()