이번에 업무에서 NIO를 사용할 일이 있어서 공부하면서 내용을 정리해보고자 합니다.
해당 포스팅은 palpit Vlog님의 블로그의 내용을 보면서 정리한 내용입니다.
NIO 네트워크?
NIO를 이용하여 TCP 관련 기능을 구현하려면 아래 구현 방식 중에 하나를 결정해야 합니다.
- 블로킹
- 넌블로킹
TCP 블로킹 채널
NIO에서 TCP 네트워크를 위해서는 아래 채널을 사용합니다.
java.nio.channels.ServerSocketChannel // 서버용
java.nio.channels.SocketChannel       // 클라이언트용
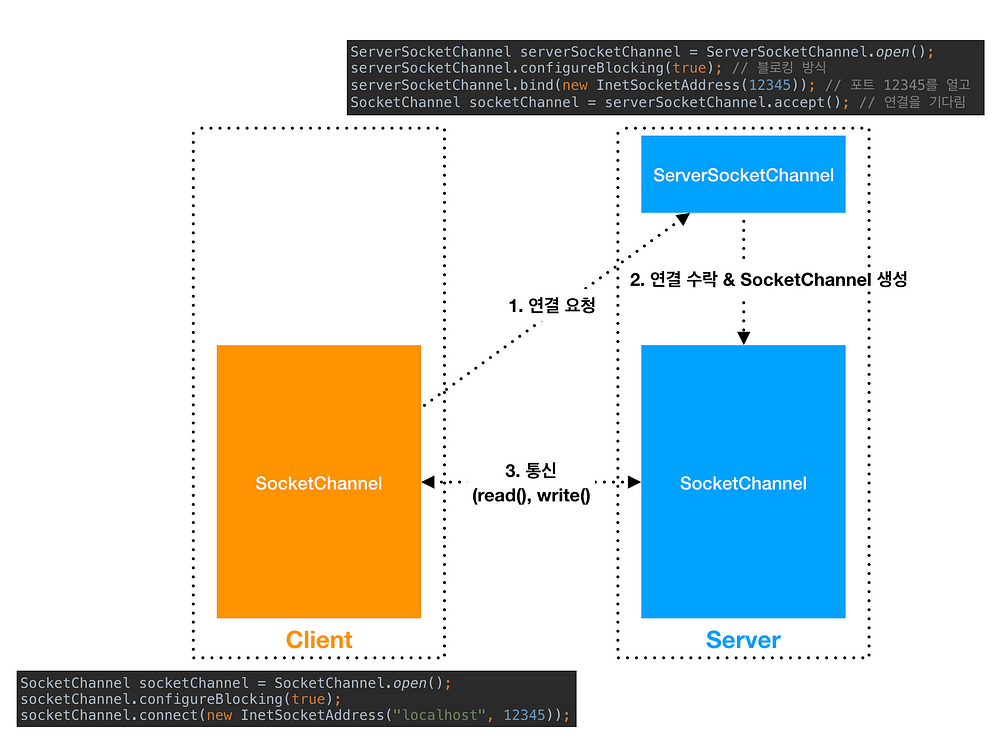
서버쪽에서 채널을 열기 위해서는 아래와 같이 ServerSocketChannel을 열어야 합니다.
ServerSocketChannel serverSocketChannel = ServerSocketChannel.open();
serverSocketChannel.configureBlocking(true); // 블로킹 방식
serverSocketChannel.bind(new InetSocketAddress(12345)); // 포트 12345를 연결을 위해서 열어놓음

SocketChannel socketChannel = serverSocketChannel.accept(); // 이 부분에서 연결이 될때까지 블로킹
클라이언트쪽에서는 채널을 열기 위해서 아래와 같이 SocketChannel을 열어야 합니다.
SocketChannel socketChannel = SocketChannel.open();
socketChannel.configureBlocking(true);
socketChannel.connect(new InetSocketAddress("localhost", 12345));
둘 다 사용이 끝나면 close()로 닫아주어야 합니다.
serverSocketChannel.close();
socketChannel.close();
아래는 서버 예제입니다.
import java.io.IOException;
import java.net.InetSocketAddress;
import java.nio.ByteBuffer;
import java.nio.channels.ServerSocketChannel;
import java.nio.channels.SocketChannel;
import java.nio.charset.Charset;


public class Server {

    public static void main(String[] args) throws IOException {

        ServerSocketChannel serverSocketChannel = ServerSocketChannel.open();
        serverSocketChannel.configureBlocking(true); // 블로킹 방식
        serverSocketChannel.bind(new InetSocketAddress(12345)); // 포트 12345를 열고


        while (true) {
            SocketChannel socketChannel = serverSocketChannel.accept(); // 이 부분에서 연결이 될때딱지 블로킹
            InetSocketAddress inetSocketAddress = (InetSocketAddress) socketChannel.getRemoteAddress();
            System.out.println("Connected : " + inetSocketAddress.getHostName());

            Charset charset = Charset.forName("UTF-8");

            // Client로부터 글자 받기
            ByteBuffer byteBuffer = ByteBuffer.allocate(100);
            socketChannel.read(byteBuffer); // 클라이언트로부터 데이터 읽기
            byteBuffer.flip();
            System.out.println("Received Data : " + charset.decode(byteBuffer).toString());

            // "Hello Client"란 글자 보내기
            byteBuffer = charset.encode("Hello Client");
            socketChannel.write(byteBuffer);

            System.out.println("Sending Success");
        }

    }
}
결과
Connected : localhost
Received Data : Hello Server
Sending Success
아래는 클라이언트 예제입니다.
import java.io.IOException;
import java.net.InetSocketAddress;
import java.nio.ByteBuffer;
import java.nio.channels.SocketChannel;
import java.nio.charset.Charset;

public class Client {

    public static void main(String[] args) throws IOException {
        SocketChannel socketChannel = SocketChannel.open();
        socketChannel.configureBlocking(true);

        System.out.println("Require Connection");
        socketChannel.connect(new InetSocketAddress("localhost", 12345));
        System.out.println("Connection Success");

        ByteBuffer byteBuffer;
        Charset charset = Charset.forName("UTF-8");

        // "Hello Server"란 글자 보내기
        byteBuffer = charset.encode("Hello Server");
        socketChannel.write(byteBuffer);
        System.out.println("Sending Success");

        // Server로부터 데이터 받기
        byteBuffer = ByteBuffer.allocate(100);
        socketChannel.read(byteBuffer);
        byteBuffer.flip();

        String data = charset.decode((byteBuffer)).toString();
        System.out.println("Received Data : " + data);

        if (socketChannel.isOpen())
            socketChannel.close();

    }
}
결과
Require Connection
Connection Success
Sending Success
Received Data : Hello Client
TCP 넌블로킹 채널
블로킹 방식은 언제 클라이언트가 연결 요청을 할지 모르기 때문에 accept()에서 블로킹됩니다, read() 또한 언제 데이터를 전달할지 모르기때문에 블로킹됩니다.
그래서 ServerSocketChannel과 SocketChnnel은 개별 스레드로 할당되어야 하는데, 연결된 클라이언트가 많아질수록 스레드의 수가 증가하고, 이는 성능상의
이슈를 유발할 수 있습니다. 그래서 이를 해결하기 위해 스레드풀(ExecutorService)을 사용할 수 있습니다.
하지만 논블로킹 방식은 connect(), accept(), read(), write()에서 블로킹이 없습니다. 만약 아래와 같은 코드이면, 블로킹이 되지 않기 때문에
무한루프 돌게 됩니다.
while (true) {
    SocketChannel socketChannel = serverSocketChannel.accept(); // Non-blocking 모드에서는 블록 X
}
그래서 논블로킹 모드에서는 Selector라 하는 이벤트 리스너를 사용하여, 논블로킹 채널에 Selector를 등록해 놓으면 클라이언트의 연결 요청이 들어오거나,
데이터가 도착할 경우 채널은 Selector에 통보합니다. 그럼 Selector에서 해당 작업을 처리를 하게 됩니다.
Selector는 멀티 채널의 작업을 싱글 스레드에서 처리할 수 있도록 멀티플렉서(multiplexor)도 제공합니다.
채널은 Selector에 등록과정
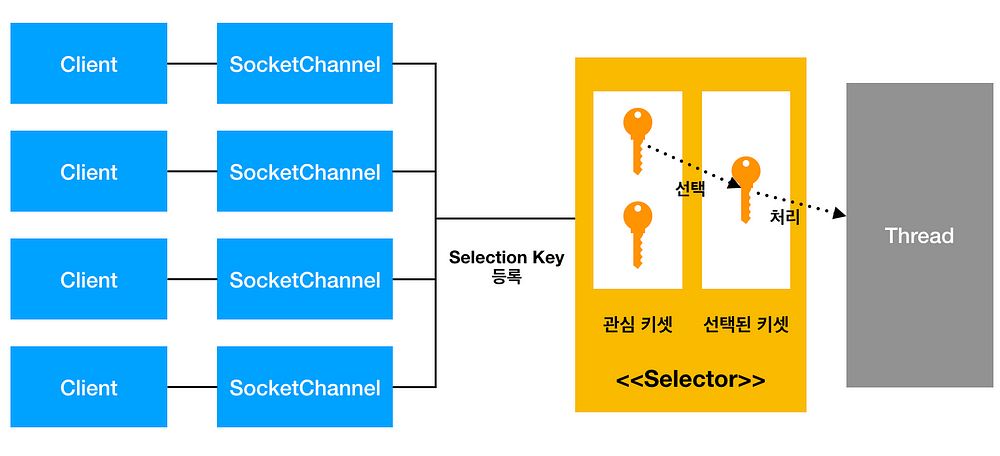
SelectionKey 생성 -> 관심키셋에 저장 -> 선택된 키셋에 별도로 저장 -> 선택된 키셋에서 하나씩 꺼내 처리
셀렉터의 생성
Selector selector = Selector.open();
Channel 생성하고 중요한 점은 configureBlocking(false)를 해서 논블록으로 만들어야 합니다.
ServerSocketChannel serverSocket = ServerSocketChannel.open(); // Server Socket Channel 열고
serverSocket.bind(new InetSocketAddress(5454));
serverSocket.configureBlocking(false); // Non-blocking 설정, 필수!!
이제 Selector에 Channel을 등록하는데, 위에서 만든 Selector와 작업을 등록합니다.
이렇게 하면 관심 키셋에 저장이 됩니다.
대신 작업은 하나의 Channel당 하나의 작업만 등록이 가능합니다.
SelectionKey selectionKey = serverSocket.register(selector, SelectionKey.OP_ACCEPT); // SelectionKey 관리할 때

// 또는

serverSocket.register(selector, SelectionKey.OP_ACCEPT); // SelectionKey 관리 안할 때
SelectionKey의 작업 목록
OP_ACCEPT: ServerSocketChannel의 연결 수락OP_CONNECT: SocketChannel의 서버로 연결OP_READ: SocketChannel의 데이터 읽기OP_WRITE: Socket Channel의 데이터 쓰기
만약 SelectionKey 관리안할 때 SelectionKey를 가져오고 싶으면 아래와 같이 언제든 가져올 수 있습니다.
SelectionKey selectionKey = socketChannel.keyFor(selector);
만약 작업을 변경하고 싶으면 아래와 같이 interstOps(작업) 이용해야 합니다.
SocketChannel은 읽기와 쓰기가 가능할 수 있음
selectionKey.interstOps(SelectionKey.OP_WRITE); // 작업 변경
selector.wakeup(); // 블로킹 된 select()를 리턴시키고 다시 실행
Selector를 구동하려면 select() 메소드를 호출해야 하는데, select() 메소드는 관심키셋에 저장된
SelectionKey로부터 작업 처리 준비가 되었다는 통보가 올때까지 블로킹 합니다. (별도의 스레드 처리해야)
select(): 최소한 하나의 채널이 작업 처리 준비가 될 때까지 블로킹 합니다.select(long timeout): select()와 동일하지만 주어진 시간동안만 블로킹 합니다.selectNow(): 호출 즉시 리턴되며, 작업 처리가 준비된 채널이 있으면채널 수를 리턴하고, 없으면0을 리턴합니다.
select()가 리턴되는 경우는 다음과 같습니다.
채널이 작업 처리 준비가 되었다고 통보할 때- Selector의
wakeup()메소드를 호출할 때 - select()를 호출한 스레드가
인터럽트될 때
그리고 이제 선택된 키를 얻기 위해서는 selectedKeys()를 호출하여 Set 형태로 가져옵니다.
Set<SelectionKey> selectedKeys = selector.selectedKeys();
그리고 작업유형을 감지할수 있는 메소드도 지원을 하고 있습니다.
isAcceptable(): 작업 유형이OP_ACCEPT인 경우isConnectable(): 작업 유형이OP_CONNECT인 경우isReadable(): 작업 유형이OP_READ인 경우isWritable(): 작업 유형이OP_WRITE인 경우
if (selectionKey.isAcceptable()) {
    // Do something
} else if (selectionKey.isReadable()) {
    // Do something
} else if (selectionKey.isWritable()) {
    // Do something
}
아래는 서버 예제입니다.
import java.io.IOException;
import java.net.InetSocketAddress;
import java.nio.ByteBuffer;
import java.nio.channels.SelectionKey;
import java.nio.channels.Selector;
import java.nio.channels.ServerSocketChannel;
import java.nio.channels.SocketChannel;
import java.util.Iterator;
import java.util.Set;
import java.util.Vector;

public class Server {
    private Selector selector = null;
    private Vector room = new Vector();

    public void initServer() throws IOException {
        selector = Selector.open(); // Selector 열고
        ServerSocketChannel serverSocketChannel = ServerSocketChannel.open(); // 채널 열고
        serverSocketChannel.configureBlocking(false); // Non-blocking 모드 설정
        serverSocketChannel.bind(new InetSocketAddress(12345)); // 12345 포트를 열어줍니다.

        // 서버소켓 채널을 셀렉터에 등록한다.
        serverSocketChannel.register(selector, SelectionKey.OP_ACCEPT);
    }

    public void startServer() throws Exception {
        System.out.println("Server Start");

        while (true) {
            selector.select(); //select() 메소드로 준비된 이벤트가 있는지 확인한다.

            Set<SelectionKey> selectionKeySet = selector.selectedKeys();
            Iterator iterator = selectionKeySet.iterator();

            while (iterator.hasNext()) {
                SelectionKey selectionKey = (SelectionKey) iterator.next();

                if (selectionKey.isAcceptable()) {
                    accept(selectionKey);
                }
                else if (selectionKey.isReadable()) {
                    read(selectionKey);
                }

                iterator.remove();
            }
        }
    }

    private void accept(SelectionKey key) throws Exception {
        ServerSocketChannel server = (ServerSocketChannel) key.channel();

        // 서버소켓 accept() 메소드로 서버소켓을 생성한다.
        SocketChannel socketChannel = server.accept();
        // 생성된 소켓채널을 비 블록킹과 읽기 모드로 셀렉터에 등록한다.

        if (socketChannel == null)
            return;

        socketChannel.configureBlocking(false);
        socketChannel.register(selector, SelectionKey.OP_READ);

        room.add(socketChannel); // 접속자 추가
        System.out.println(socketChannel.toString() + "클라이언트가 접속했습니다.");
    }

    private void read(SelectionKey key) {
        // SelectionKey 로부터 소켓채널을 얻는다.
        SocketChannel socketChannel = (SocketChannel) key.channel();
        ByteBuffer byteBuffer = ByteBuffer.allocateDirect(1024); // buffer 생성

        try {
            socketChannel.read(byteBuffer); // 클라이언트 소켓으로부터 데이터를 읽음
        }
        catch (IOException ex) {
            try {
                socketChannel.close();
            }
            catch (IOException e) {
                e.printStackTrace();
            }

            room.remove(socketChannel);
            ex.printStackTrace();
        }

        try {
            broadcast(byteBuffer);
        } catch (IOException ex) {
            ex.printStackTrace();
        }

        byteBuffer.clear();
    }

    private void broadcast(ByteBuffer byteBuffer) throws IOException {
        byteBuffer.flip();
        Iterator iterator = room.iterator();

        while (iterator.hasNext()) {
            SocketChannel socketChannel = (SocketChannel) iterator.next();

            if (socketChannel != null) {
                socketChannel.write(byteBuffer);
                byteBuffer.rewind();
            }
        }
    }
}
아래는 클라이언트 예제입니다.
import java.io.IOException;
import java.net.InetSocketAddress;
import java.nio.ByteBuffer;
import java.nio.channels.SelectionKey;
import java.nio.channels.Selector;
import java.nio.channels.SocketChannel;
import java.nio.charset.Charset;
import java.nio.charset.CharsetDecoder;
import java.util.Iterator;
import java.util.Scanner;

public class Client {

    static Selector selector = null;
    private SocketChannel socketChannel = null;

    public void startServer() throws IOException {
        initServer();
        Receive receive = new Receive();
        new Thread(receive).start();
        startWriter();
    }

    private void initServer() throws IOException {
        selector = Selector.open();
        socketChannel = SocketChannel.open(new InetSocketAddress("localhost", 12345));
        socketChannel.configureBlocking(false);
        socketChannel.register(selector, SelectionKey.OP_READ);
    }

    private void startWriter() {
        ByteBuffer byteBuffer = ByteBuffer.allocateDirect(1024);
        try {
            while (true) {
                Scanner scanner = new Scanner(System.in);
                String message = scanner.next();
                byteBuffer.clear();
                byteBuffer.put(message.getBytes());
                byteBuffer.flip();
                socketChannel.write(byteBuffer);
            }
        }
        catch (Exception ex) {
            ex.printStackTrace();
        }
        finally {
            clearBuffer(byteBuffer);
        }
    }

    static void clearBuffer(ByteBuffer buffer) {
        if (buffer != null) {
            buffer.clear();
        }
    }
}

class Receive implements Runnable {
    private CharsetDecoder decoder = null;

    public void run() {
        Charset charset = Charset.forName("UTF-8");
        decoder = charset.newDecoder();
        try {
            while (true) {
                Client.selector.select();
                Iterator iterator = Client.selector.selectedKeys().iterator();

                while (iterator.hasNext()) {
                    SelectionKey key = (SelectionKey) iterator.next();

                    if(key.isReadable())
                        read(key);

                    iterator.remove();
                }
            }
        }
        catch (Exception ex) {
            ex.printStackTrace();
        }
    }

    private void read(SelectionKey key) {
        SocketChannel socketChannel = (SocketChannel) key.channel();
        ByteBuffer byteBuffer = ByteBuffer.allocateDirect(1024);

        try {
            byteBuffer.flip();
            String data = decoder.decode(byteBuffer).toString();
            System.out.println("Receive Message - " + data);
            Client.clearBuffer(byteBuffer);
        }
        catch (IOException ex){
            try {
                socketChannel.close();
            }
            catch (IOException e) {
                e.printStackTrace();
            }
        }
    }
}